See also Notes on 18th Century Stockings
Knitting Gauge:
__ stitches per inch, - 10% for stretch = __ st./in.
__ rows per inch
 Circumference
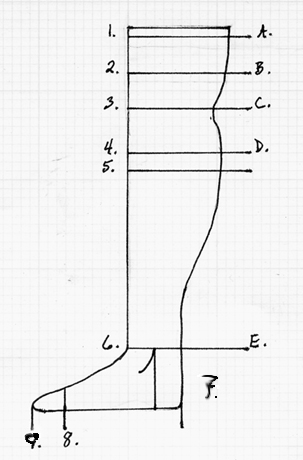
A: Thigh: __ inches x __ st./in. = __ stitches
B. Lower thigh measurement (optional): __ inches x __ st./in. = __
stitches
C. Knee: __ inches x __ st./in. = __ stitches
D. Calf: __ inches x __ st./in. = __ stitches
E. Ankle: __ inches x __ st./in. = __ stitches
Length:
1-2: __ in. x r/in. = __ rows (__ decreases)
2-3: __ in. x r/in. = __ rows (__ decreases)
3-4: __ in. x r/in. = __ rows (__ increases)
Knit plain for one or two inches between 4 and 5.
5-6: __ in. x r/in. = __ rows (__ decreases)
7: Heel flap = __ rows ( measure from bottom of heel to narrowest part of
ankle -- usually three to four inches).
8-9: widest part of foot (where toes start) to end of toe: __ in. x r/in.
= __ rows (__ decreases)
9: Length of foot: __ in. (from toe to heel flap) x r/in. = __ total rows
If you have large calves, you may want to add a few more measurements (both circumference and length between measurements) at the decrease of the calf, the middle of the ankle, and the ankle bone. A friend who has knitted several pairs of socks also recommends making the foot slightly longer than the total foot length measurement. It may be a good idea to knit a test pair of short socks using the same yarn you'll be using for your full-length stockings to make sure that your foot measurements will work.
Directions:
Cast on the required number of stitches, using either a larger needle
than the size you'll be knitting with or two needles, to make sure that
the first row isn't too tight. A two-strand cast-on is probably the most
correct method (Rutt, p. 13).
Knit several rows of garter stitch (one row knit, one row purl).
Plain knit for __ rows from A to B and B to C, placing decreases in pairs on either side of your back 'seam' of purl stitches (see page on 18th c. stockings for options). Space the decreases out evenly over the number of rows knitted. (Note: the pics are from a pair of 'trial socks' I've knitted; I'll replace them with pics of 18th c. stockings when those are available.)
Increase from C to D, again placing increases in pairs on either side of back 'seam'. Space increases out evenly over number of rows knitted.
Knit plain for one or two inches below D.
Decrease from D to E. Space decreases out evenly over number of rows knitted.
If you want to knit in purled clocks, figure out how many rows your clocks require, and start knitting them in before reaching point E. To figure out how many rows to knit before starting clocks, subtract the number of rows required for the clocks pattern from the total number of rows knitted from D to E.
At Point E, divide the stocking into two parts. The stitches for the front half of the stocking go on two separate needles; the stitches for the heel flap go on one needle.
Knit the heel flap (knit, then purl back) to the desired length. Make sure the flap is long enough to reach from the ankle to meet under the heel when folded in half.
Divide the stitches for the heel flap evenly onto two needles. Fold the heel flap in half; bind off using a three-needle bindoff.
Pick up the stitches along the sides of the heel flap. You should pick up half as many stitches along each side of the heel flap as there are rows in the flap. Knit the gusset, decreasing one stitch every other row on each side of the ankle until you have the same number of total stitches that you had before starting the heel flap.
Knit the foot to point 8 (the widest point of the foot).
Put the stitches onto two needles -- half the stitches for the top of the foot, half for the bottom.
Decrease evenly on each side of the foot (knit one stitch, decrease, knit to within three stitches of the end of the needle, decrease, knit one stitch) every other row until you have 8 stitches left on each needle; bind off toe using a three-needle bindoff.
Finished stocking foot, side and bottom view:
Also see:
Socks 101
Socknitters.com
lesson on knitting gussets
![]()


